Install a two-node AlwaysOn Failover Cluster Instance
Introduction
In this lab, you will learn how to install a two-node AlwaysOn SQL Server 2022 failover cluster instance (FCI) on a Windows Server 2022 Failover Cluster.
Objectives
At the end of this lab, you will be able to:
- Install SQL Server 2022 AlwaysOn failover cluster instance on a single node
- Add a node to an existing SQL Server 2022 AlwaysOn failover cluster instance
Estimated Time
45 minutes
Logon Information
Before Login make sure windows has Applied Computer Setting to all nodes.
Use the following credentials to login into virtual environment
Connect to AlwaysOnClient as Corpnet\Cluadmin using Pa$$w0rd as the password.
Click the Type Text icon to enter the associated text into the virtual machine.
Connect to AlwaysOnN1 as CORPNET\Administrator using Pa$$w0rd as the password.
Click the Type Text icon to enter the associated text into the virtual machine.
Connect to AlwaysOnN2 as CORPNET\Administrator using Pa$$w0rd as the password.
Click the Type Text icon to enter the associated text into the virtual machine.
Connect to AlwaysOnN3 as CORPNET\Administrator using Pa$$w0rd as the password.
Click the Type Text icon to enter the associated text into the virtual machine.
Connect to AlwaysOnDC as Administrator using Pa$$w0rd as the password.
Click the Type Text icon to enter the associated text into the virtual machine.
Change the screen resolution if required.
You may want to adjust the screen resolution to your own preference. Do this by right-clicking on the desktop and choosing Screen resolution and clicking OK when finished.
Exercise 1: Install SQL Server 2022 Failover Cluster Instance on a Single Cluster Node
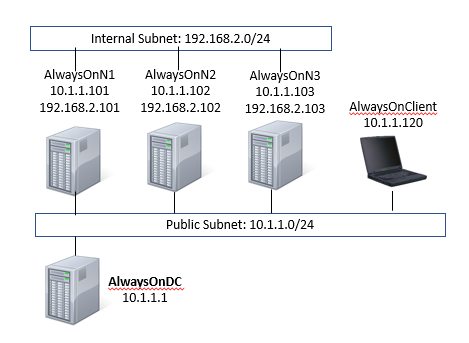
Before we begin with the first exercise in the lab, let's review the lab environment.
In the lab, we have one Domain Controller, 3-node Windows Server 2022 cluster and one Windows 10 client computer.
AlwaysOnN1 and AlwaysOnN2 nodes are in the primary Datacenter.
AlwaysOnN3 is in the secondary datacenter.
For this lab, both the datacenters are in the same subnet.
Tasks 1: Install SQL Server 2022 AlwaysOn Clustered Instance on AlwaysOnN1
[] Sign in to AlwaysOnN1 as CORPNET\cluadmin using Pa$$w0rd as the password.
Click the Type Text icon to enter the associated text into the virtual machine.
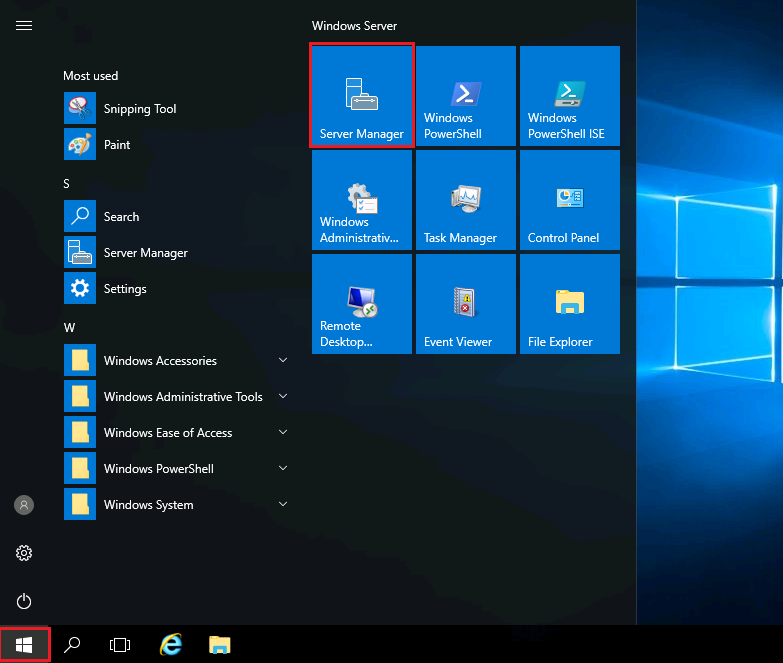
Click on the Start button and then click Server Manager.
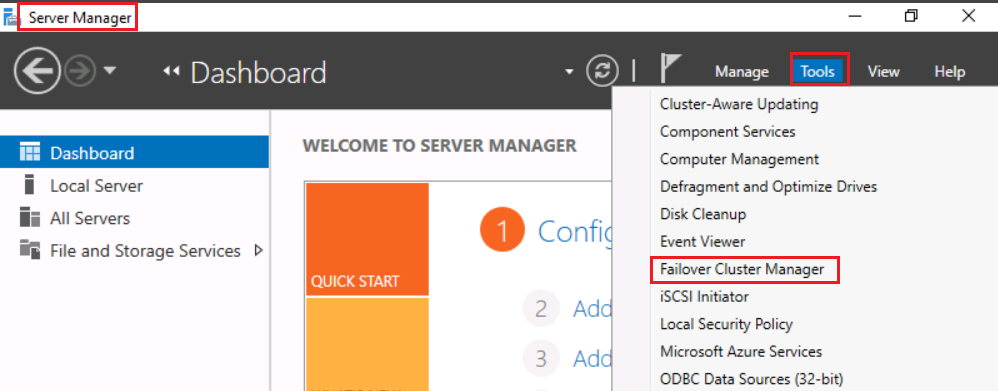
Under the Tools menu item, click on Failover Cluster Manager.
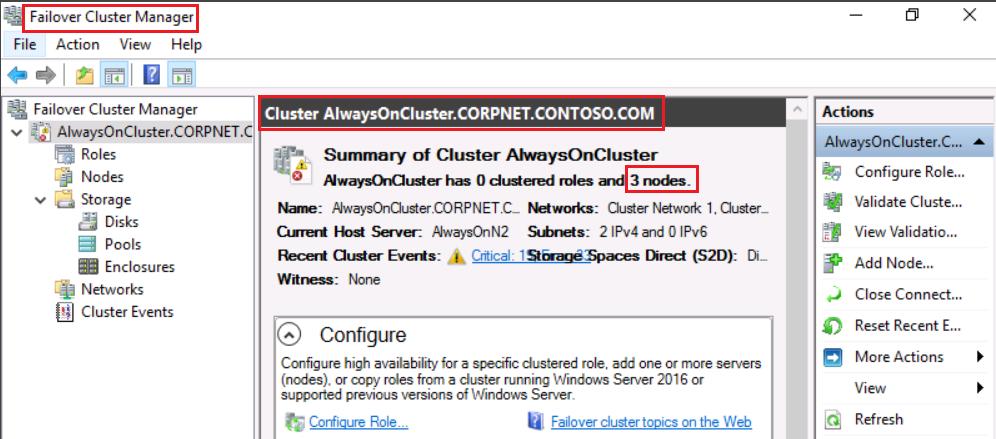
The Failover Cluster Manager will open. Review the cluster.
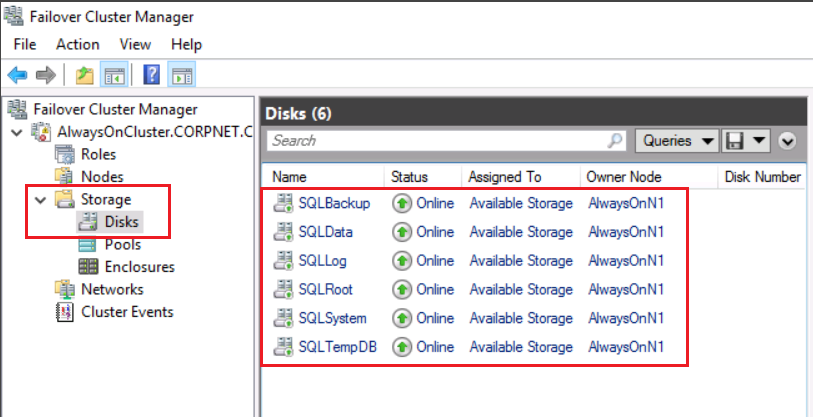
Expand the cluster name AlwaysOnCluster.CORPNET.CONTOSO.COM and click Storage > Disks. Review the shared disks that are available for the SQL Server FCI and ensure that the Owner Node is AlwaysOnN1. If not, move Available Storage group to AlwaysOnN1 by right clicking Disks and selecting Move Available Storage > Select Node > AlwaysOnN1 > OK.
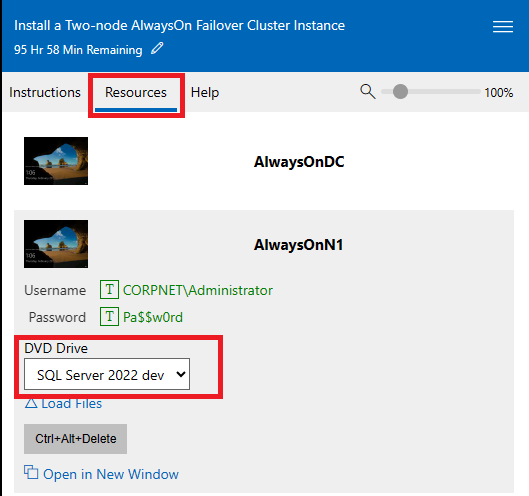
In the lab environment, on the Resources tab, select the AlwaysOnN1 machine. Click the drop-down box for DVD Drive and select the SQL Server 2022 installation media (ISO).
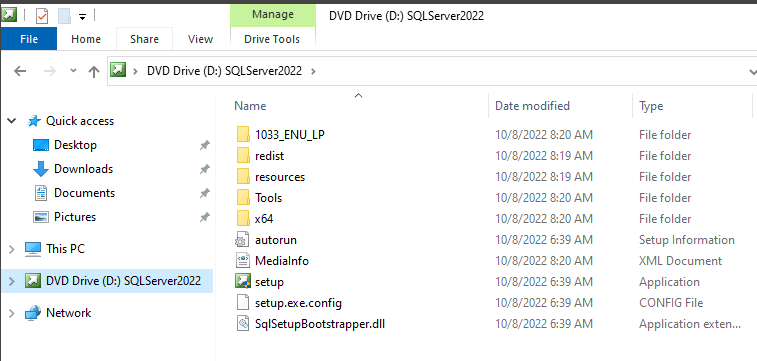
Open File Explorer in the AlwaysOnN1 machine and you should see the installation media as shown below.
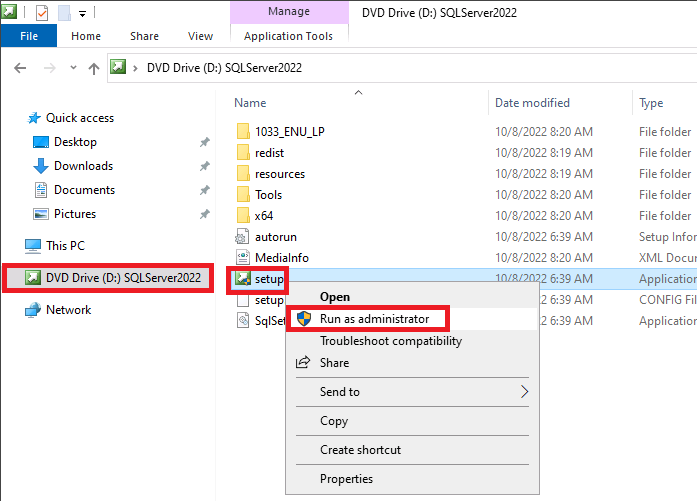
Right click Setup and select Run as administrator to launch the setup program.
This will open the User Account Control window. Click Yes.
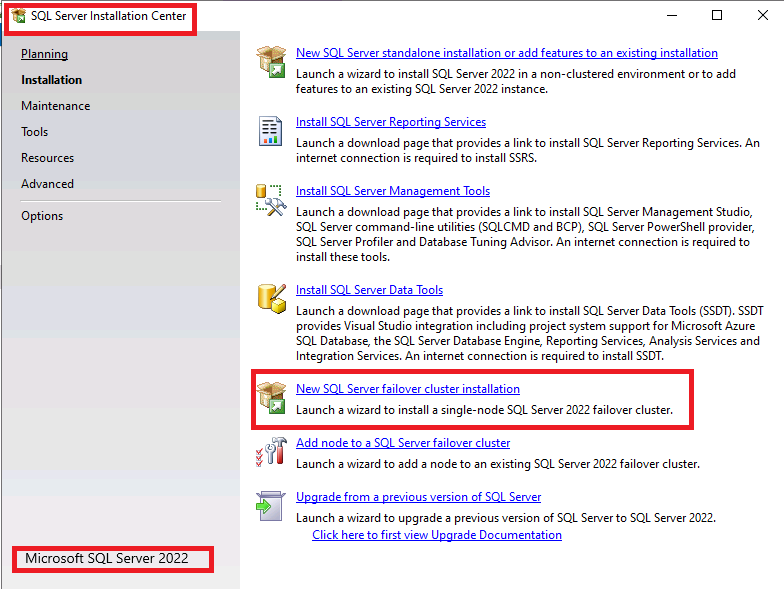
On the SQL Server Installation Center page, click Installation and then click New SQL Server failover cluster installation as shown below.
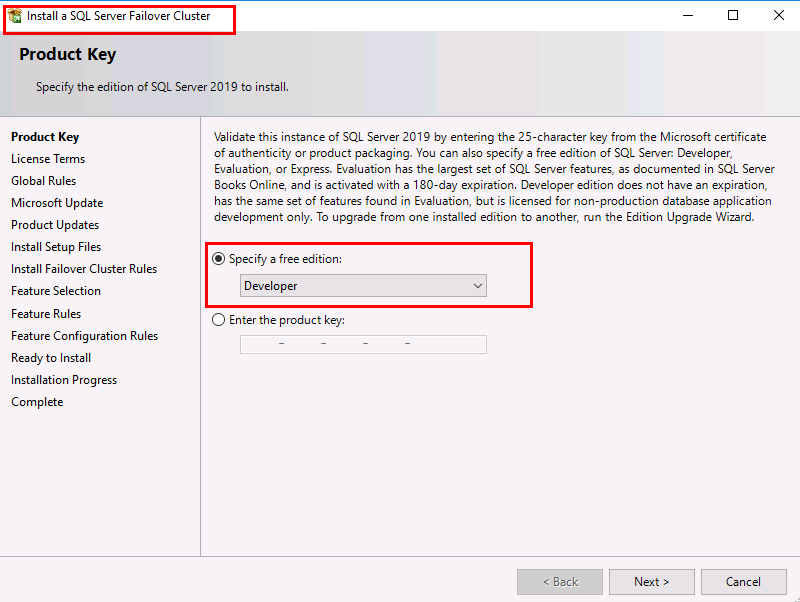
For this lab, we are going to the free Developer edition.
For production environment you cannot use developer edition and must enter the license product key.
Click Next on the Product Key page.
Accept the license terms and click Next.
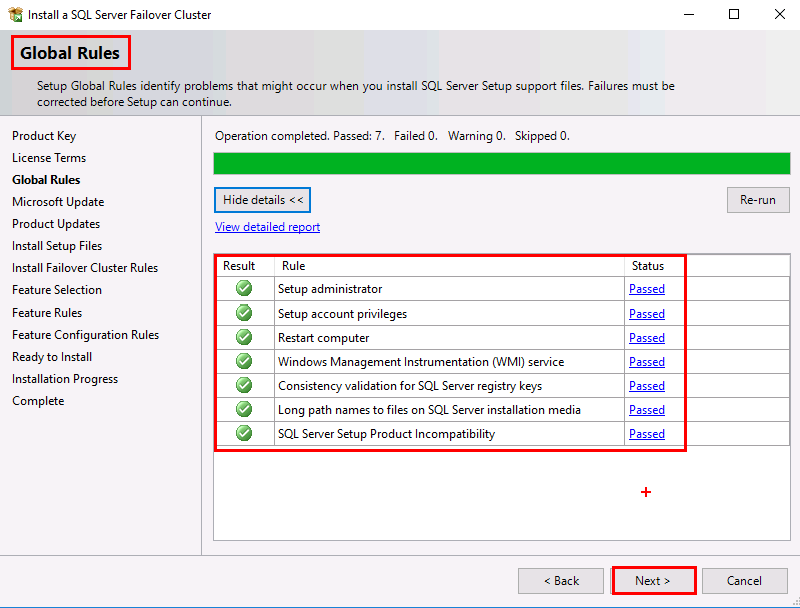
Verify that there are no errors on the Global Rules page and click Next.
On the Microsoft Updates page, do not click the checkbox to use Microsoft Update to check for updates. In this lab, we are not checking the box as the VMs are not connected to the internet. Click Next.
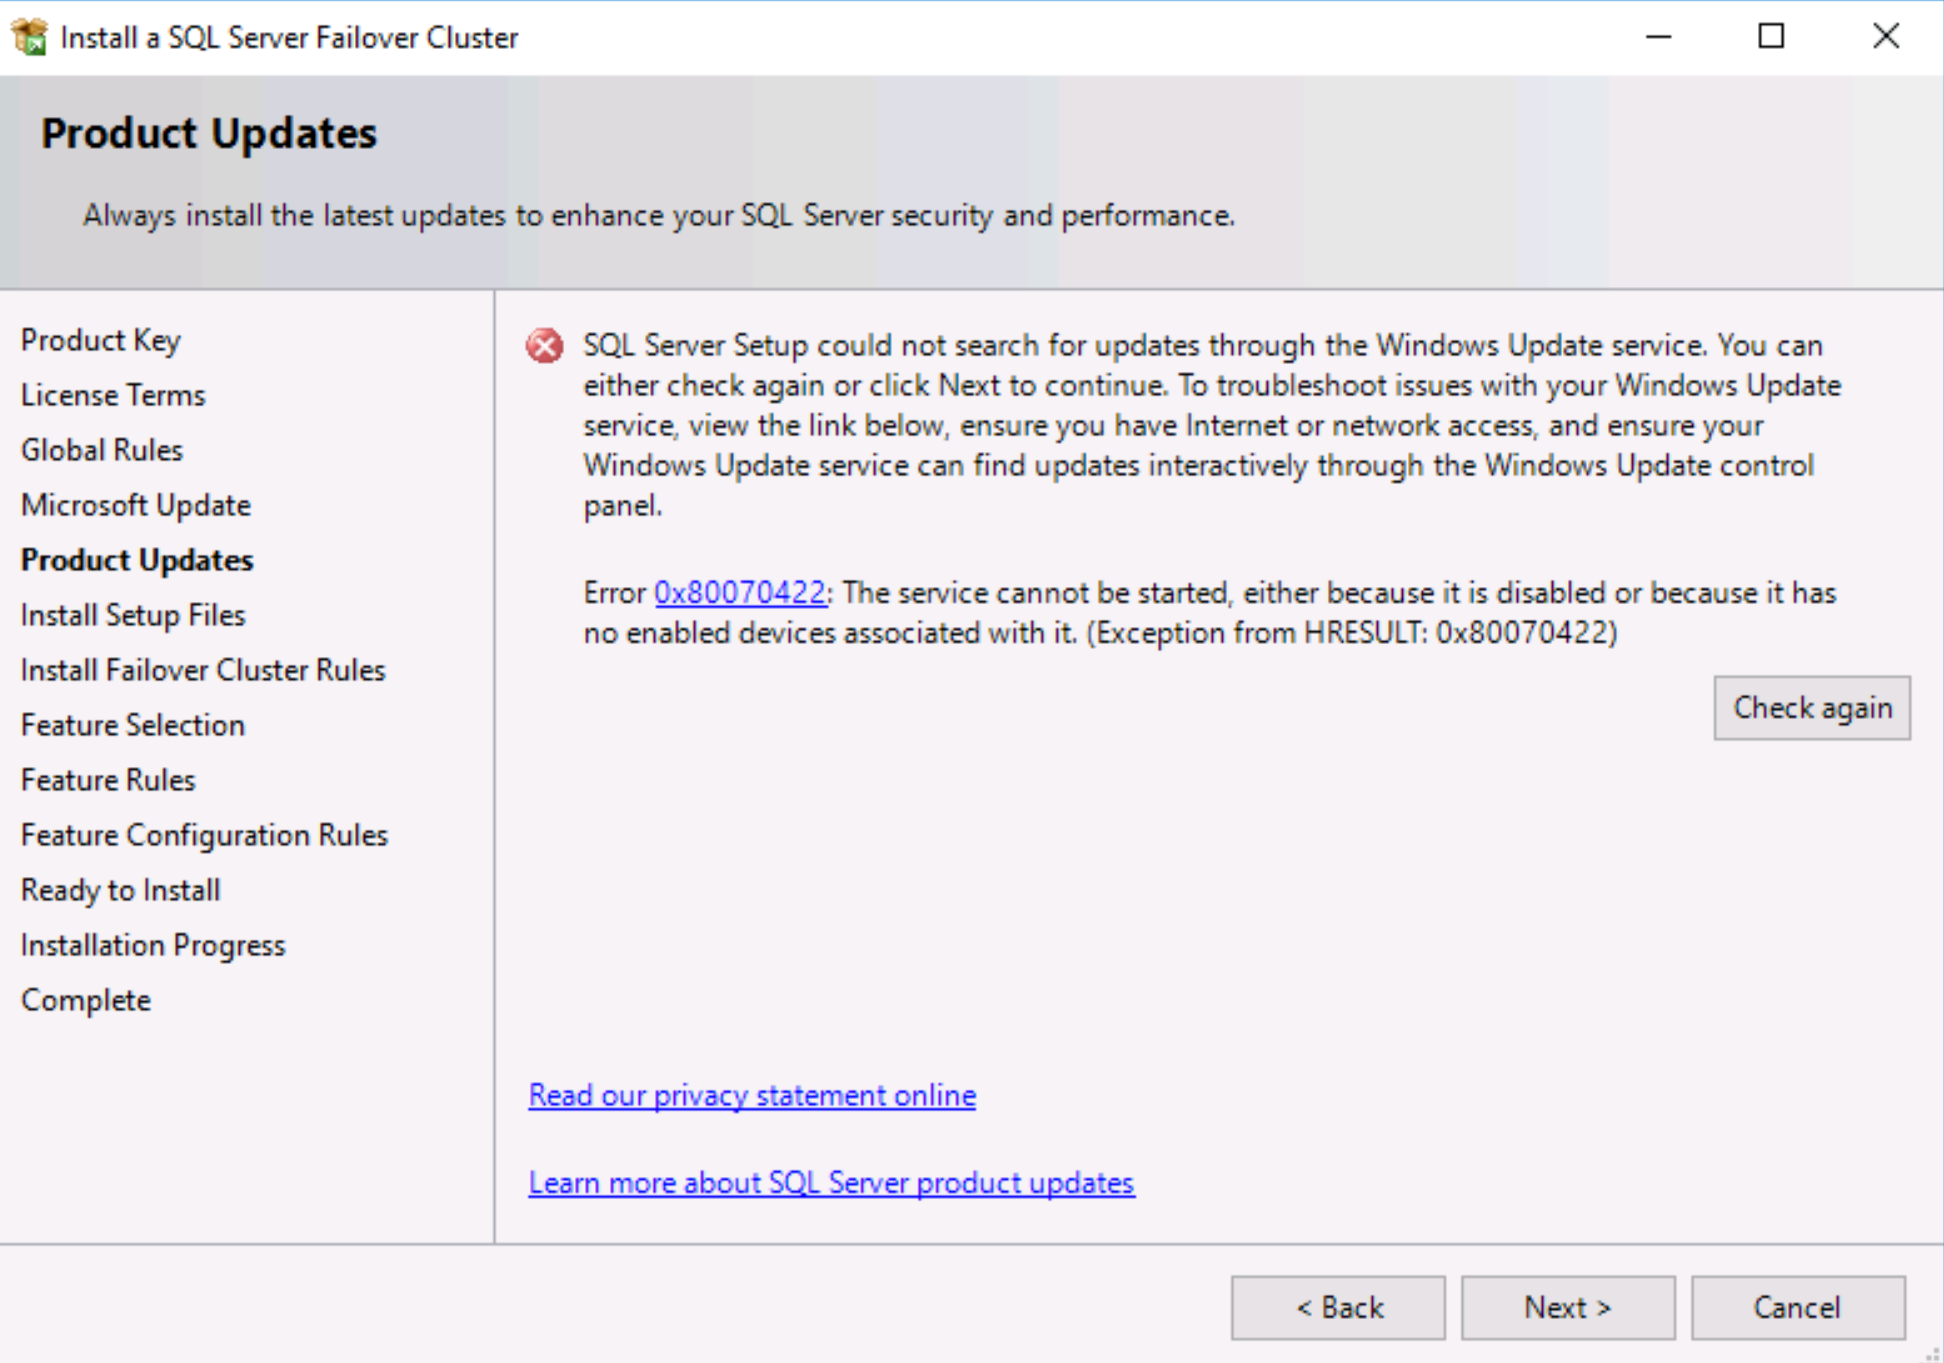
Since the virtual machine is not connected to the internet, we will get the below error. This is expected in this lab. Click Next.
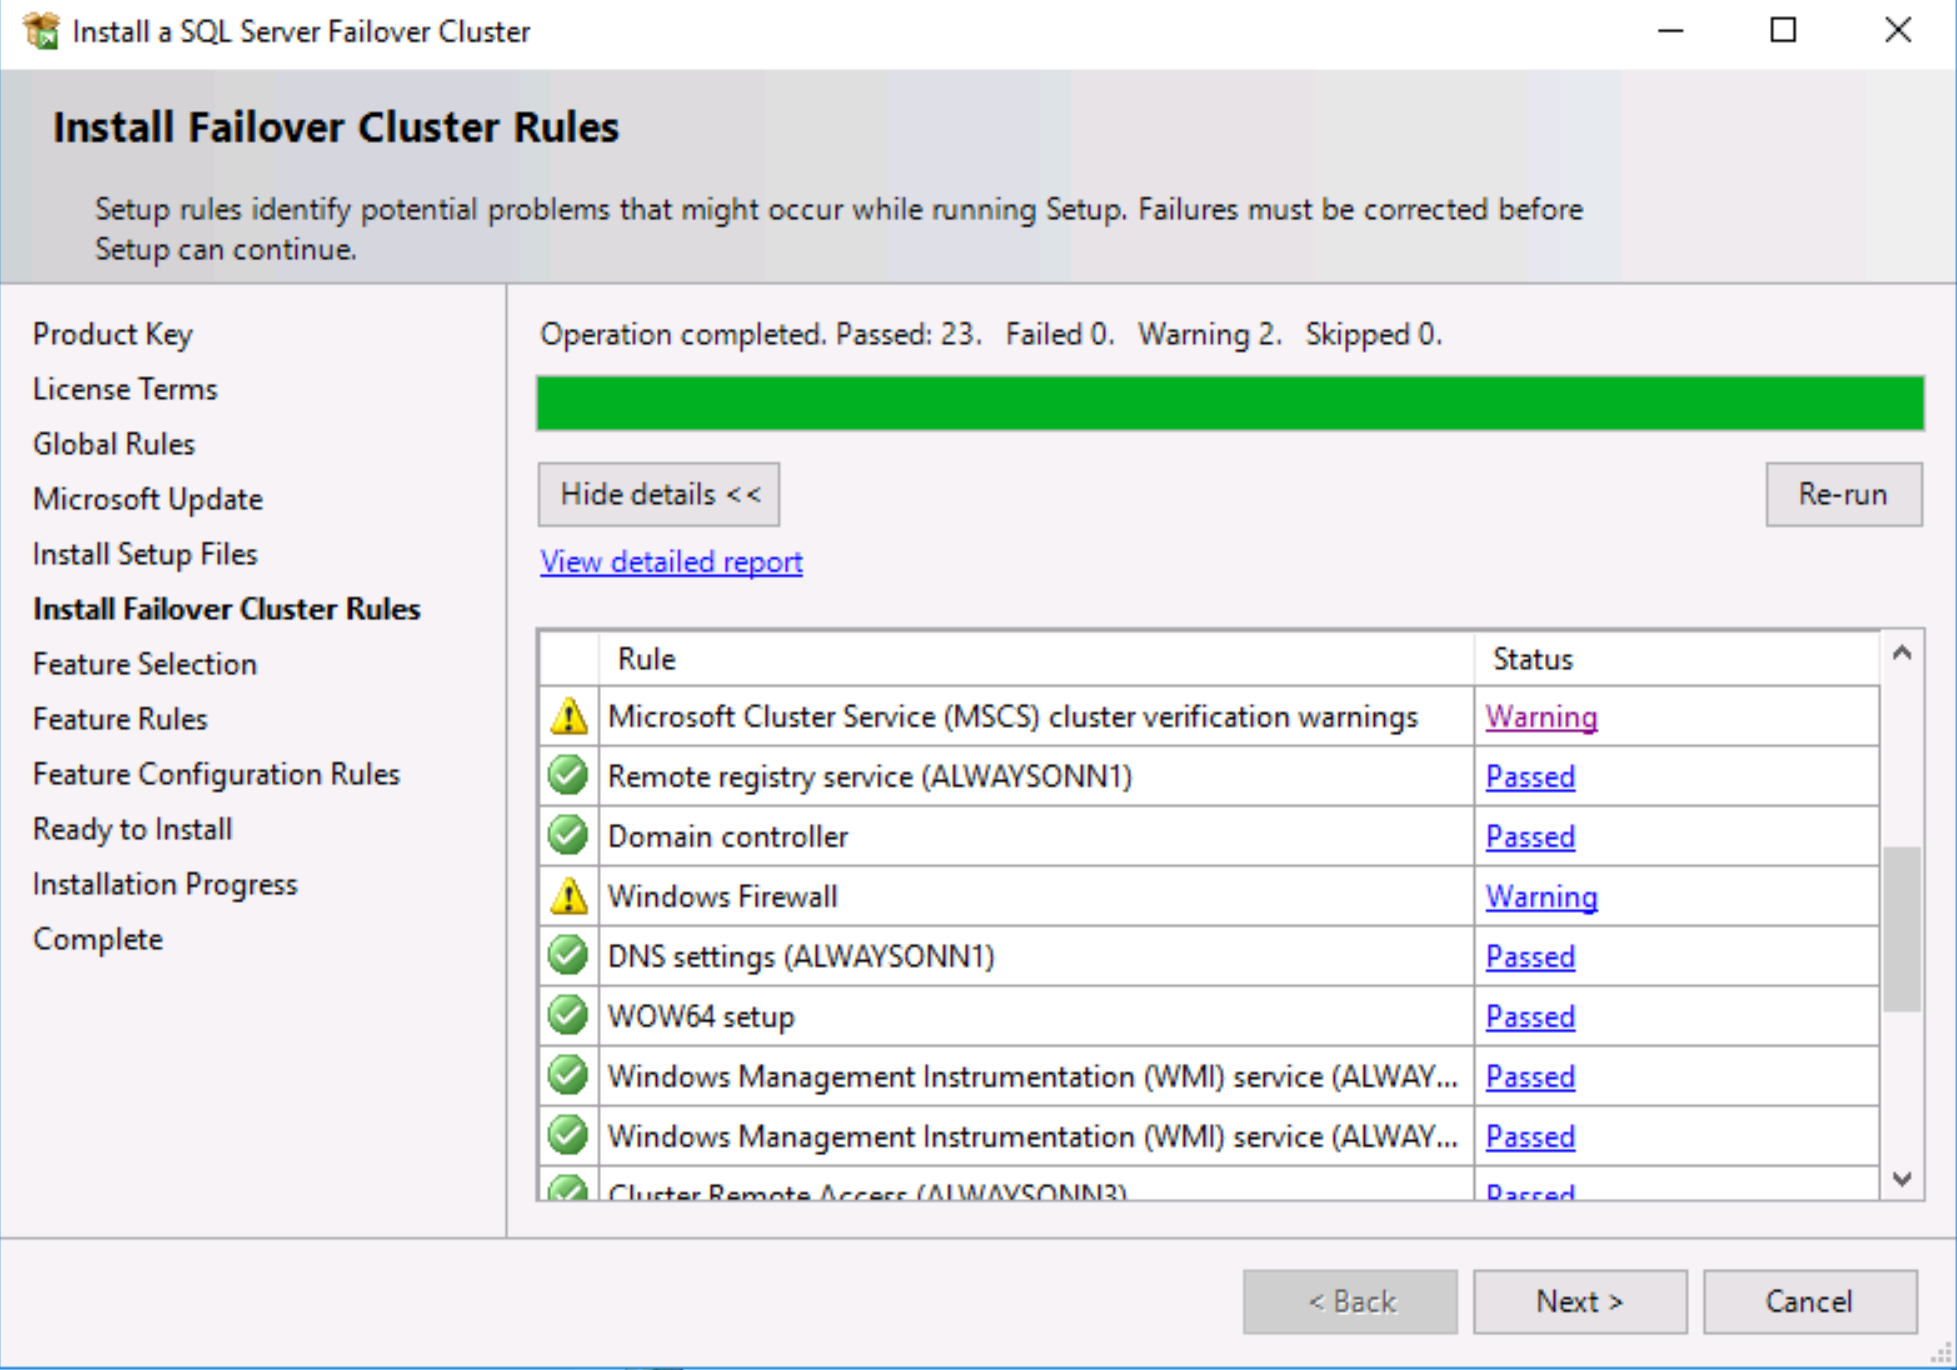
Verify that there are no failures on the Install Failover Cluster Rules page and click Next.
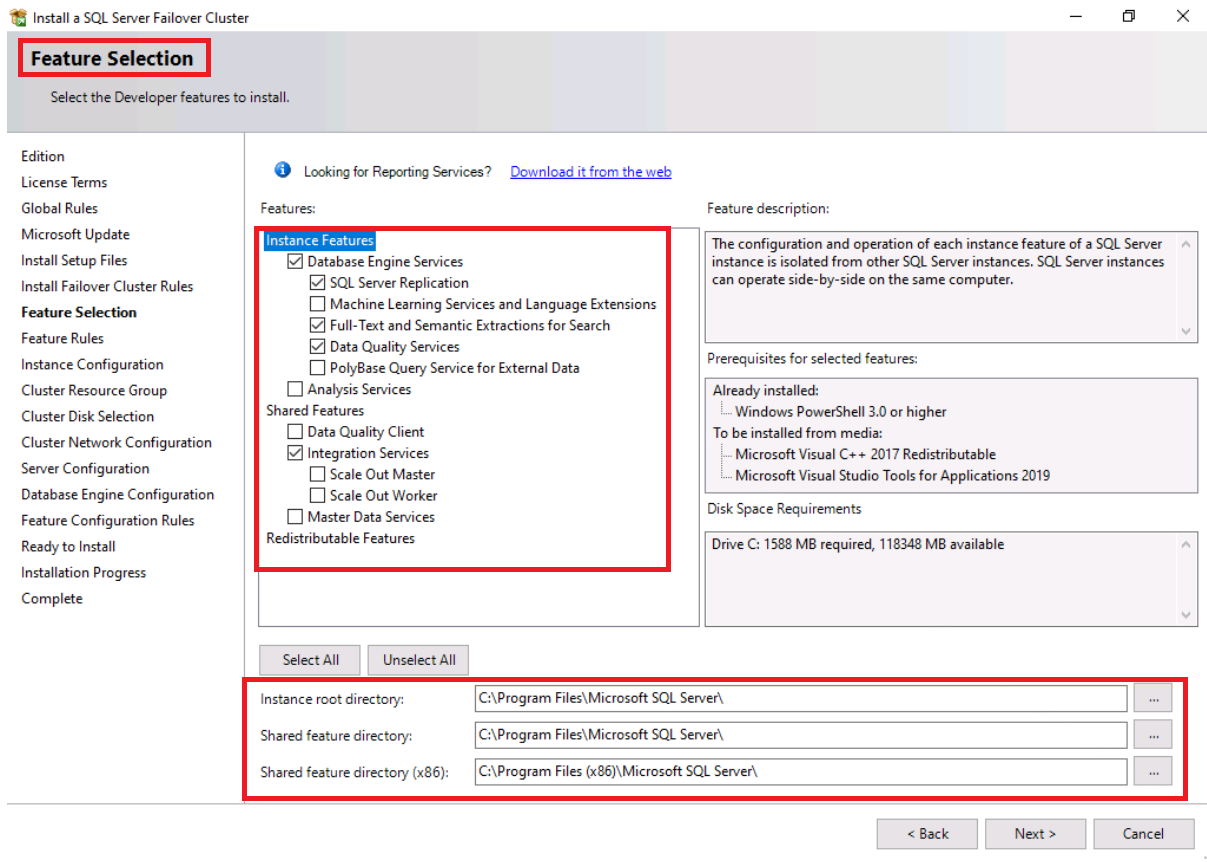
On the Feature Selection page, select the following features and click Next.
Database Engine Services
SQL Server Replication, Full-Text Semantic Extractions for Search and Data Quality Services are automatically selected when we select Database Engine Services.
Integration Services
For this lab, we are using the C:\ drive for the instance root directory and Shared Feature directory. For production environment, most customers use a non-OS drive like D:\
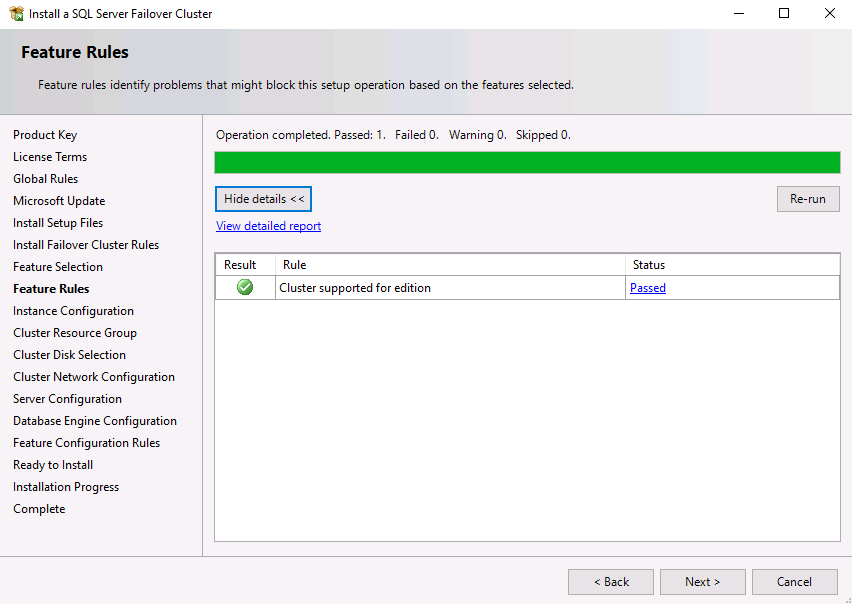
Verify there are no failures on the Features Rule page, and then click Next.
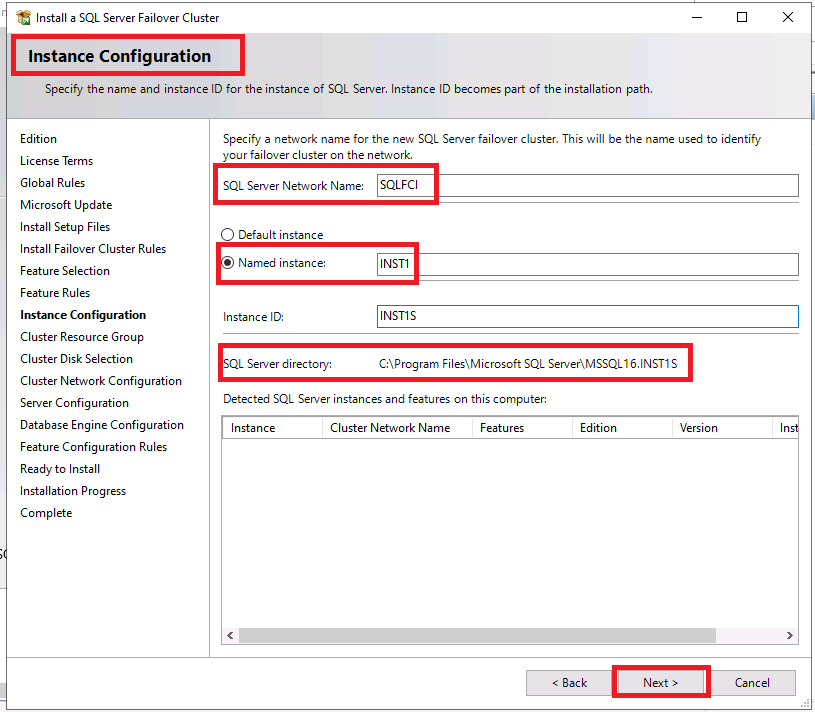
On the Instance Configuration page, type the SQL Server Network name (for example, SQLFCI).
Select whether you want it to be the default instance (MSSQLSERVER) or a named instance.
There can be only one default instance on a cluster.
In this lab, we will install a named instance. Select Named Instance and type a name (for example, INST1).
Instance ID is automatically completed with the same value of the instance name. You can change it if you want.
Click Next.
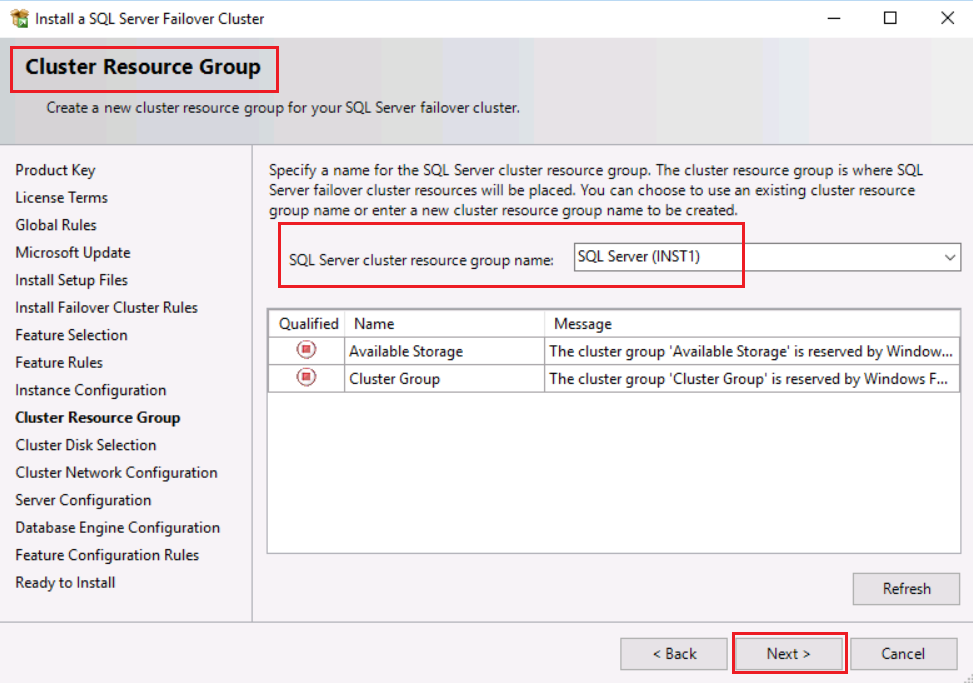
On the Cluster Resource Group page, select the cluster resource group name for SQL Server. Either leave the default or type a name that you want. For this lab, we will use the default name, and Click Next.
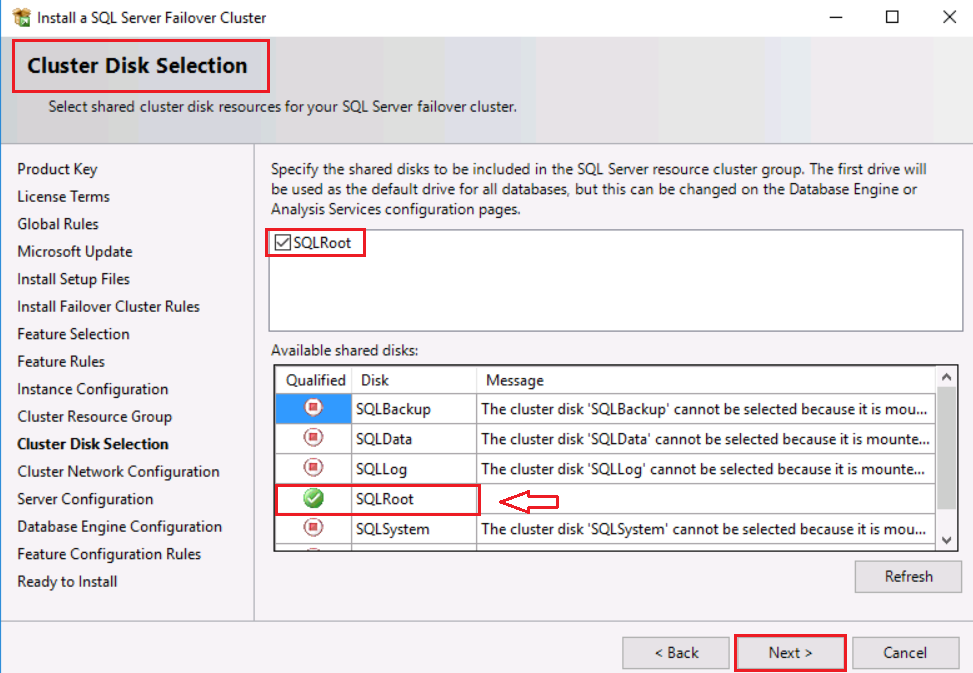
On the Cluster Disk Selection page, select the shared disks that you want to use for your SQL FCI. The available disks are marked with green as shown below. In this lab, only the SQLRoot disk is available. Review the Message column to see why other disks are not available. Check SQLRoot and click Next.
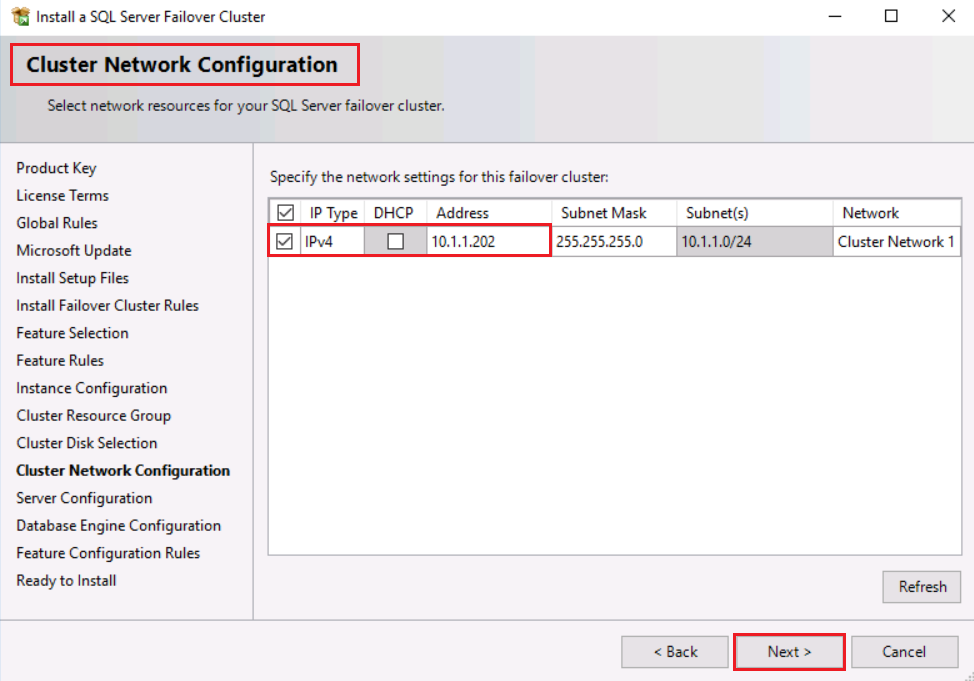
On the Cluster Network Configuration page, select IPv4 check box and ensure that the DHCP check box is cleared. Type the unique SQL Server IP address (10.1.1.202) and click Next.
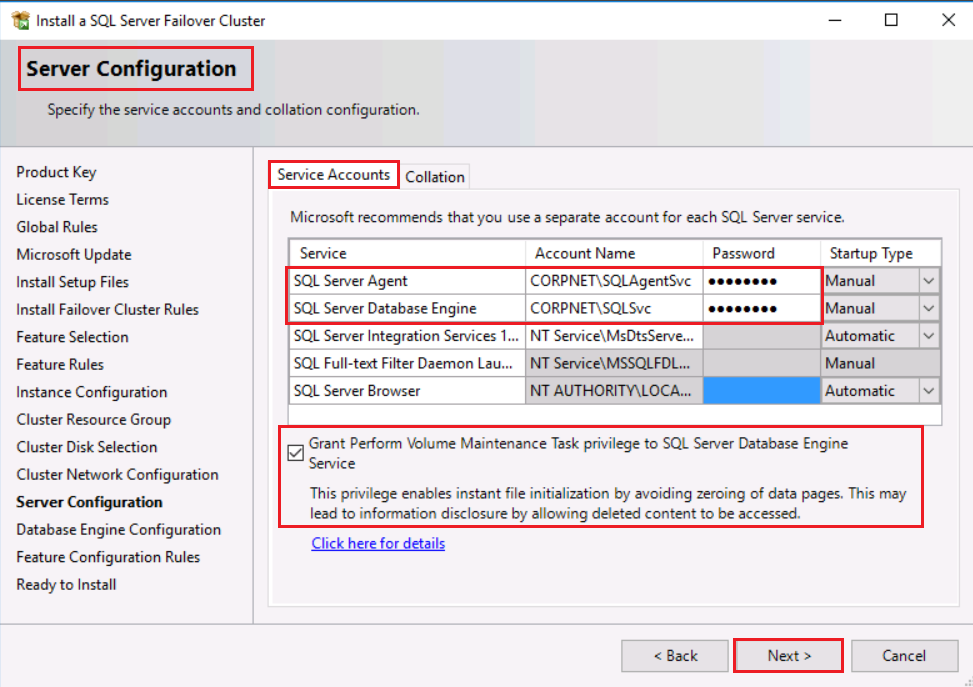
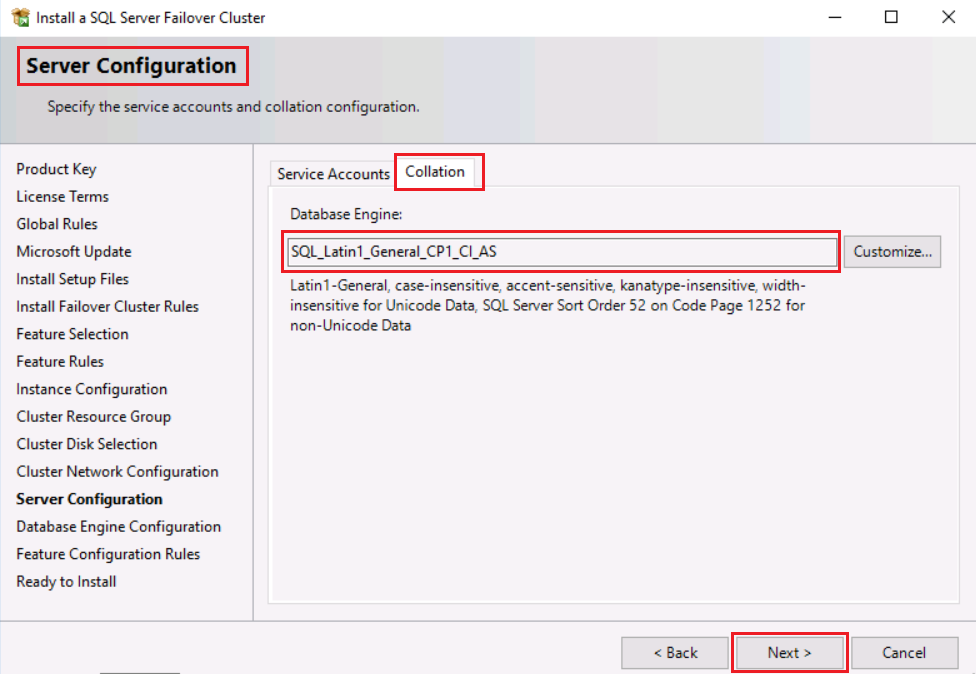
On the Server Configuration page, click the Service Accounts tab
Use CORPNET\SQLAgentSvc for the SQL Server Agent service account.
Use CORPNET\SQLSvc for the SQL Server Database Engine service account.
The password for both accounts is Pa$$w0rd
Check the Grant Perform Volume Maintenance Task privilege to SQL Server Database Engine Service checkbox. This privilege enables instant file initialization by avoiding zeroing of data pages.
If you want the keep the default Collation then Click Next otherwise go to next step
If you click the Collation tab, you can change the type of collation that you want to use. For this lab, leave the default and click Next.
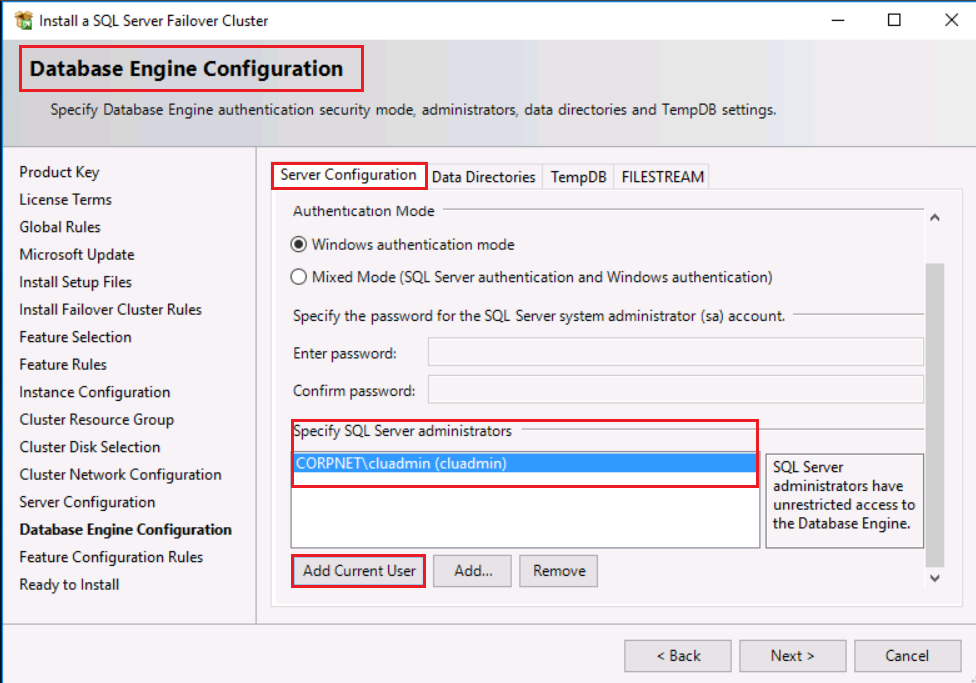
In the Database Engine Configuration window,
Select the authentication mode that you prefer (Windows or Mixed).
To add the user CORPNET\cluadmin as a SQL Server administrator
- Click Add Current User or
- Click Add and add another domain account.
This step is necessary because SQL Server does not configure the Administrators group (that is built-in to Windows Server) as system administrators for SQL Server.
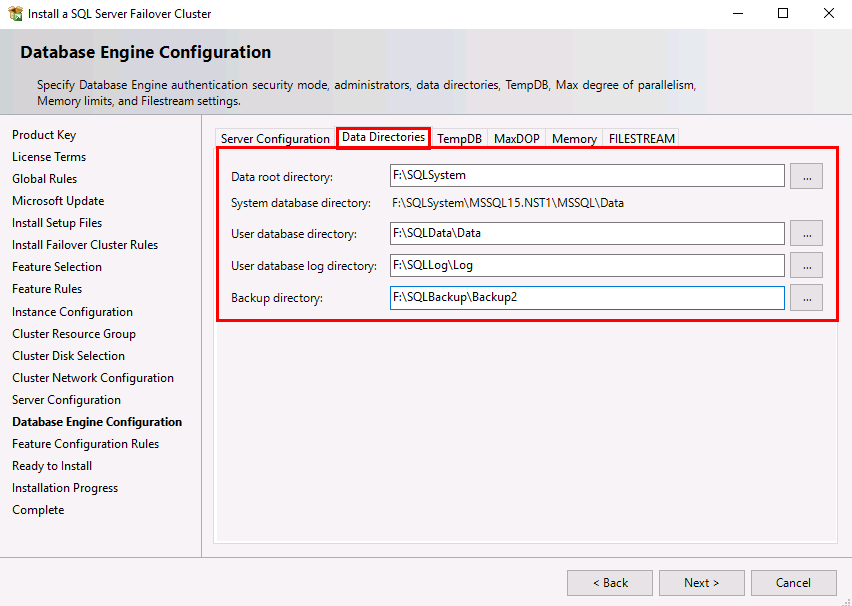
Click Data Directories tab. By default, setup uses just one disk for everything. Select the disks where you want to store the user-database data, log and backup files. For this lab, we will use the following:
Data root directory:
F:\SQLSystem
System-database directory:
F:\SQLSystem\MSSQL16.INST1\MSSQL\Data
User-database directory:
F:\SQLData\Data
User-database-log directory:
F:\SQLLog\Log
Backup directory:
F:\SQLBackup\Backup
As per best practices, we have added a folder to the root of each mounted drive. We do not have to pre-create the folders as SQL setup will create them.
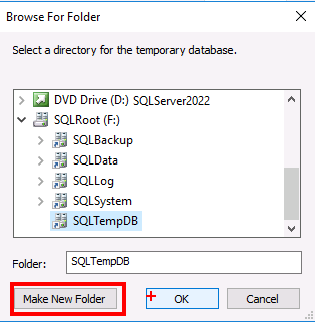
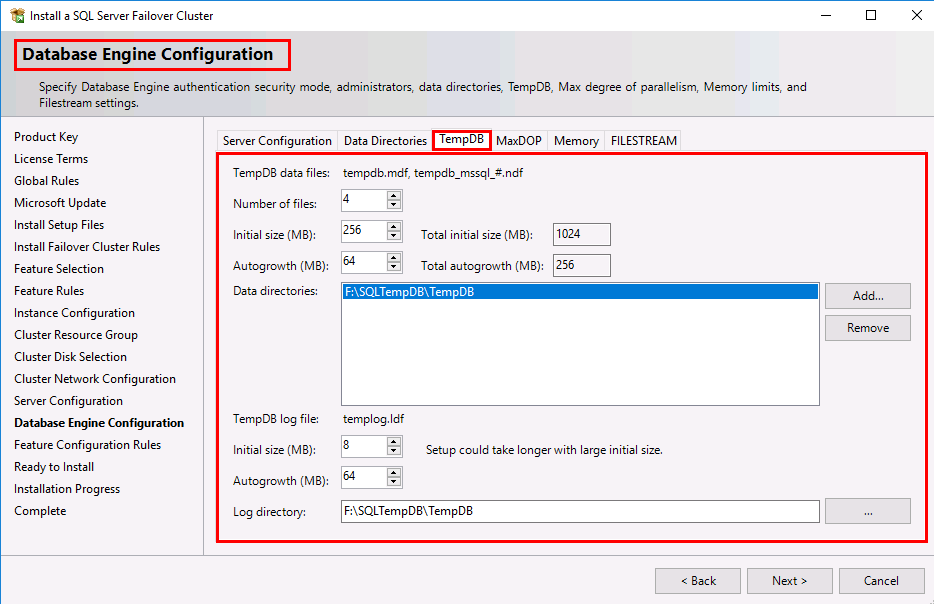
Click the TempDB tab. Configure TempDB as per best practices. In this lab, we will assume that the cluster node has 4 processors and will select 4 TempDB data files. Remove the default data directory and Add F:\SQLTempDB\TempDB as the Data and Log directories.
You will need to create the TempDB folder in F:\SQLTempDB by clicking the Make New Folder .
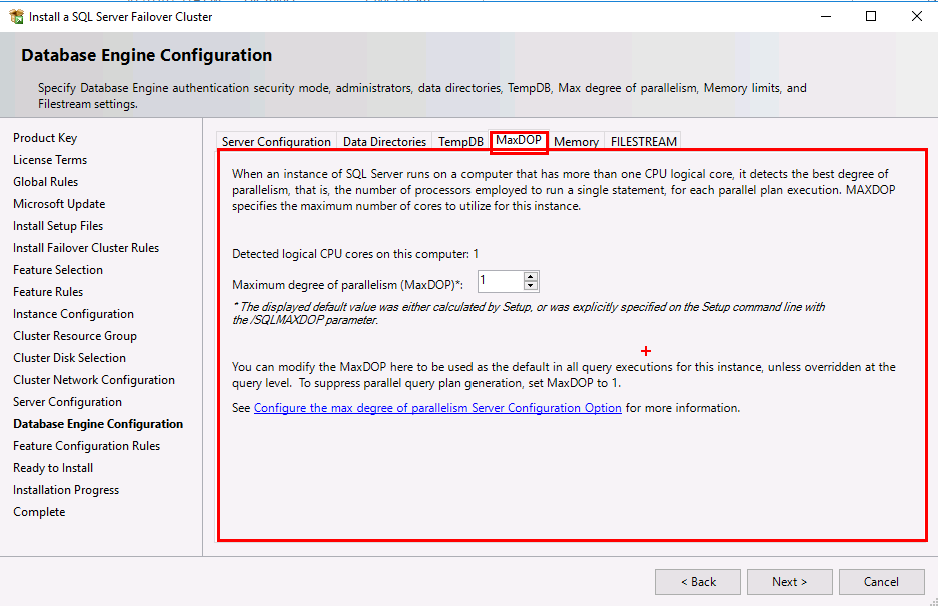
Click the MaxDOP tab. Review the configured settings for MAXDOP.
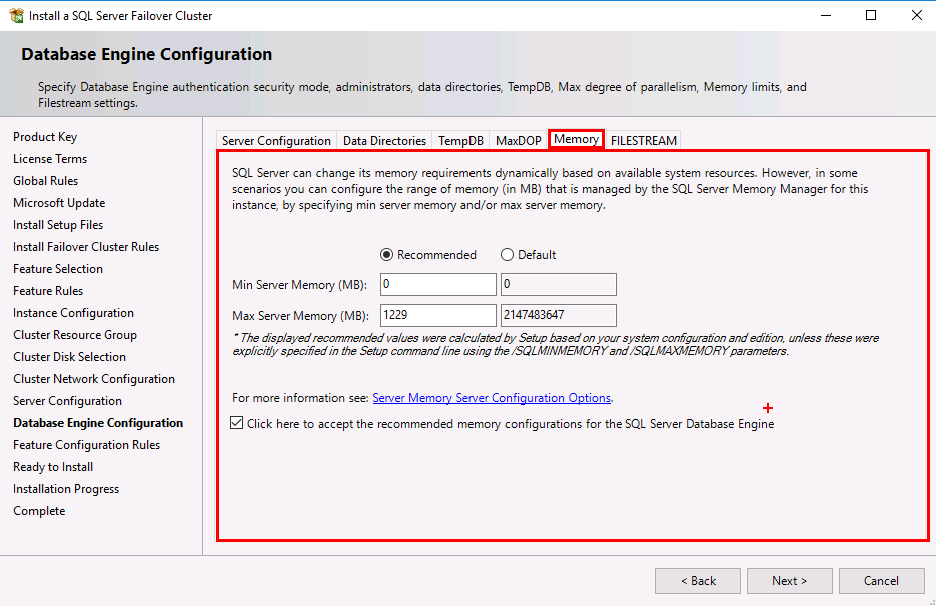
Click the Memory tab. Click the radial button to accept the recommended memory setting as per best practices. You will also need to click the check box at the bottom of the tab to accept the recommended setting.
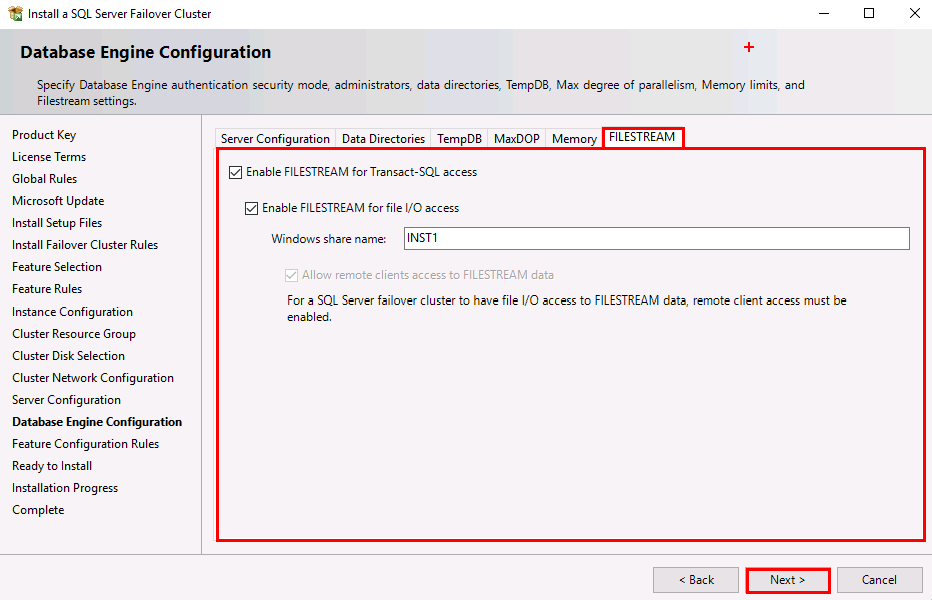
Click the FILESTREAM tab. If you want to enable the FILESTREAM feature of SQL Server, select that option. For this lab, select the boxes as shown below and Click Next.
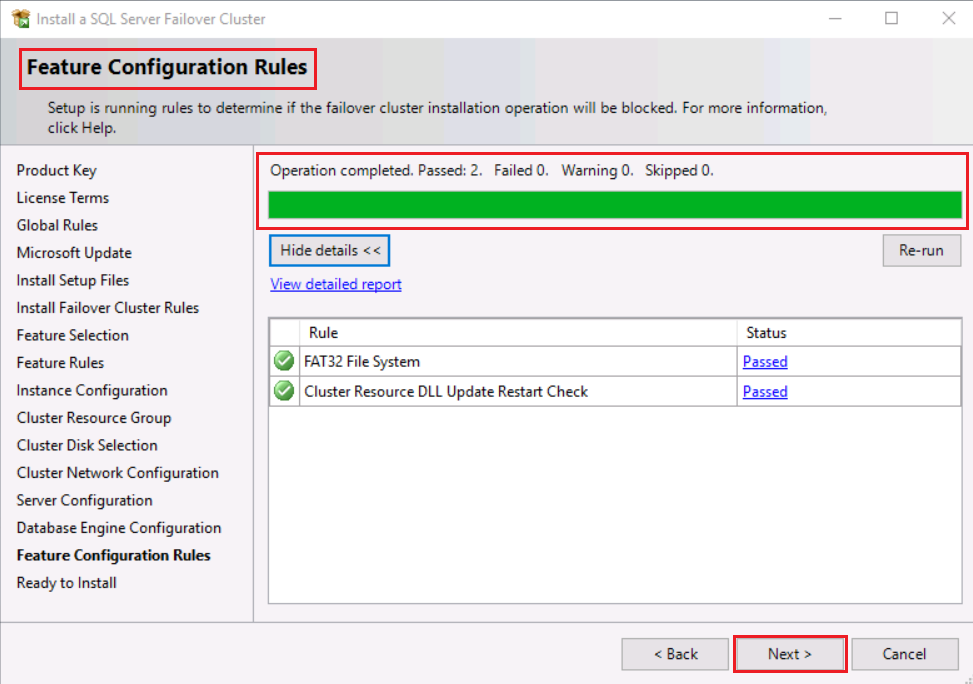
Verify there are no failures in the Feature Configuration Rules page and click Next.
On the Ready to Install page, verify that the information is correct. Click Install.
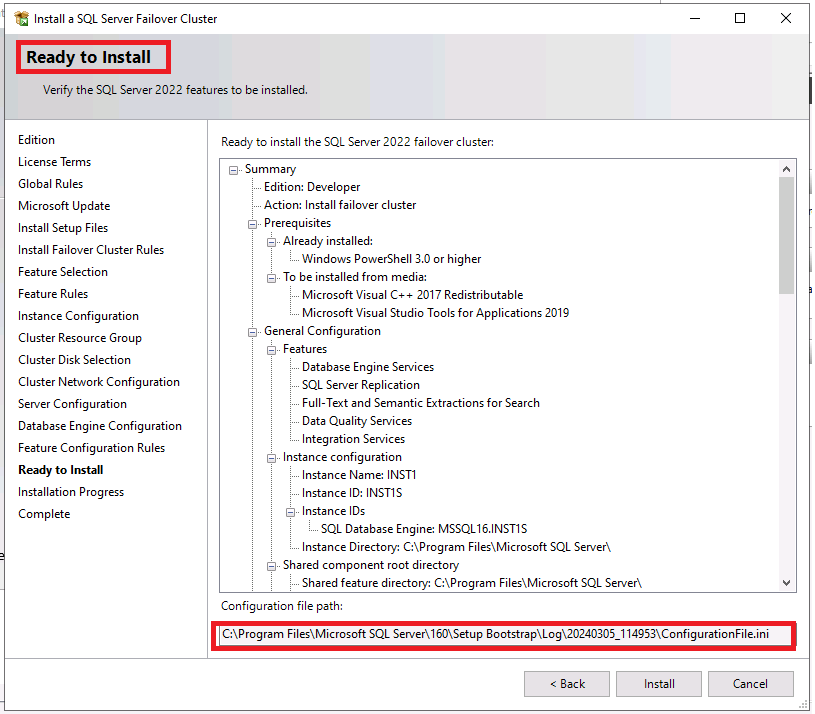
On the Ready to Install page, notice that the path to the configuration file is specified. Setup writes out all the parameters in the configuration file for the actions that ran, except for sensitive information like passwords. If you want to stop the installation now, click Cancel. Later, when you are ready, you can run the installation from the Command Prompt and supply the Configuration.ini file by using the ConfigurationFile parameter.
The following is an example on how to run setup.exe by using the configuration file:setup.exe /ConfigurationFile=MyConfigurationFile.iniFor more information, review Microsoft document Install SQL Server using a configuration file
Wait for the installation to complete.
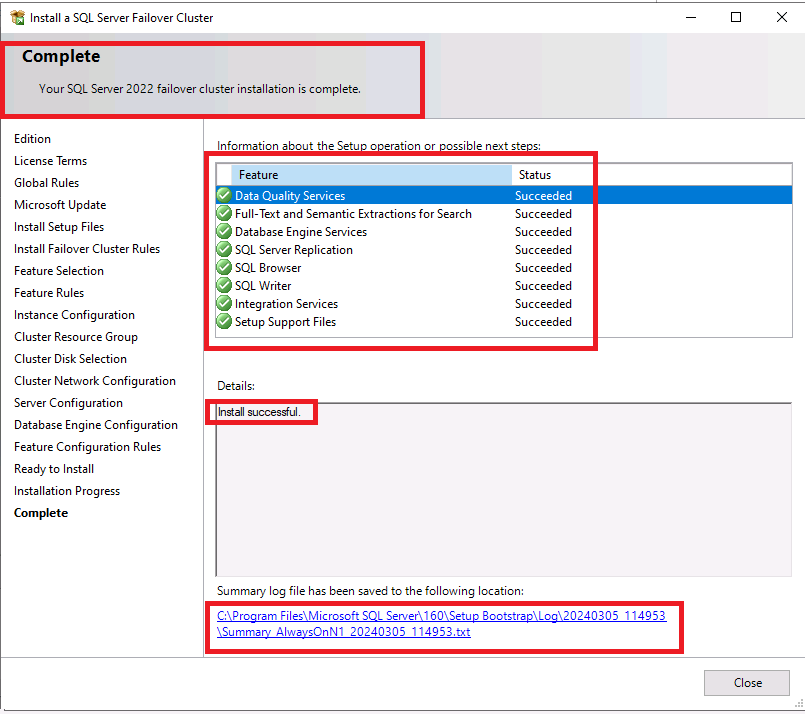
By default, the SQL Server 2022 Setup logs are on the cluster node in %Program Files%\Microsoft SQL Server\160\Setup Bootstrap\Log\<datetime>.
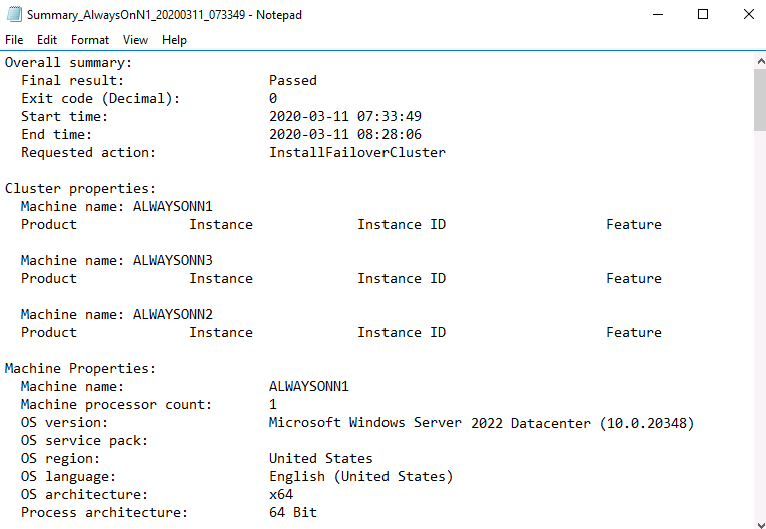
Click the Summary log link and review it. Click Close on the Complete page.
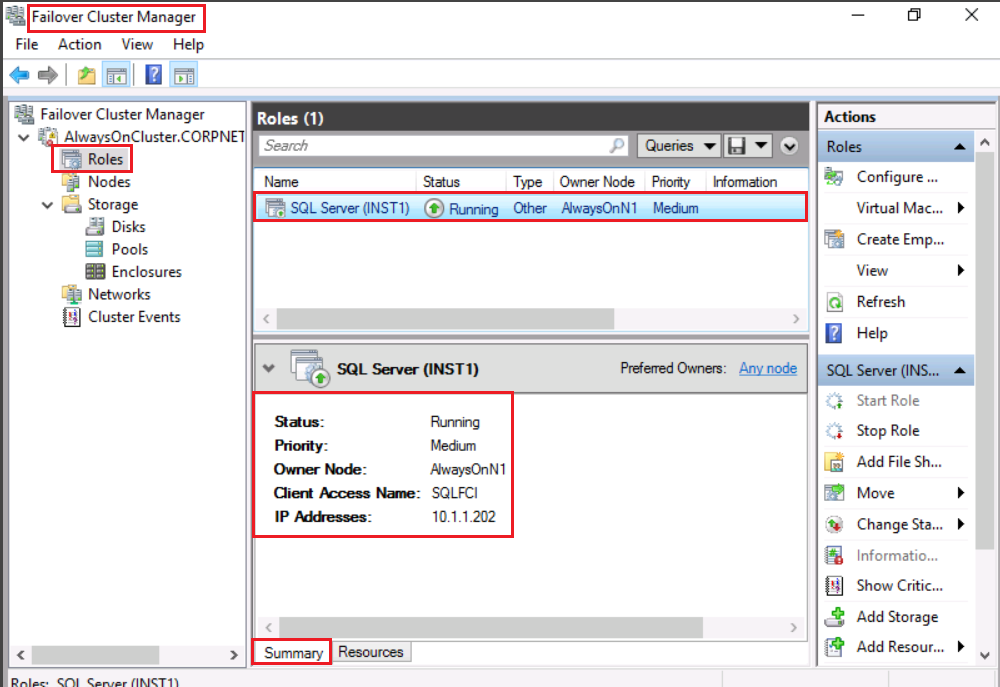
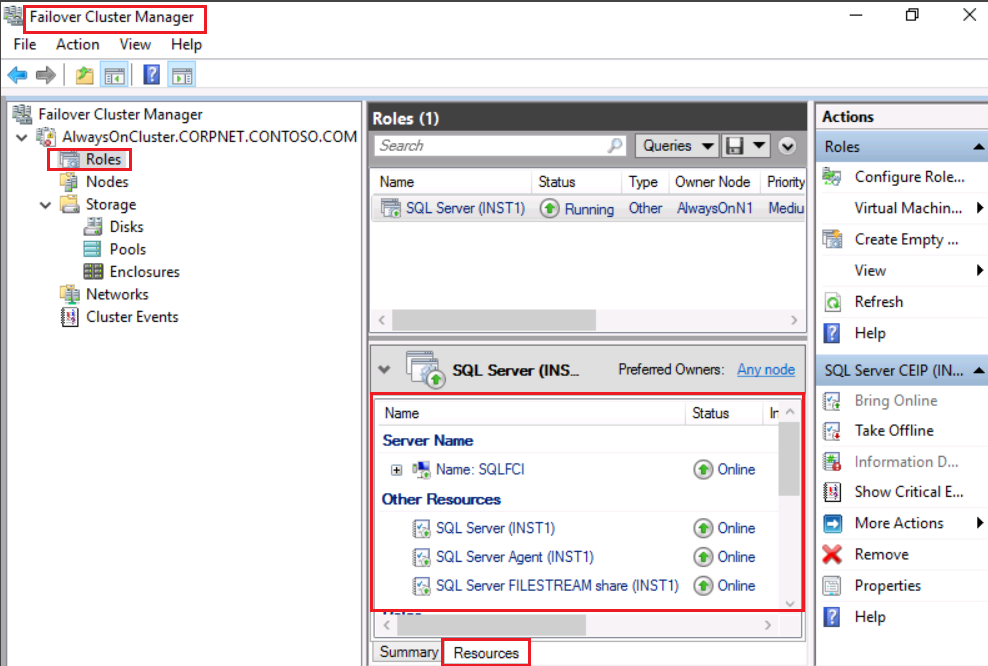
Open Failover Cluster Manager and review the SQL Server Cluster Group and Resources as shown below.
Congratulations!
You have successfully completed this exercise. Click Next to advance to the next exercise.
Exercise 2: Add a Node to an Existing SQL Server AlwaysOn Failover Clustered Instance
In this exercise, you will learn how to add a Node to an Existing SQL Server AlwaysOn Failover Clustered Instance
Tasks 1: Add a node to an existing SQL Server failover
Sign in to virtual machine AlwaysOnN2 as CORPNET\cluadmin using Pa$$w0rd as the password.
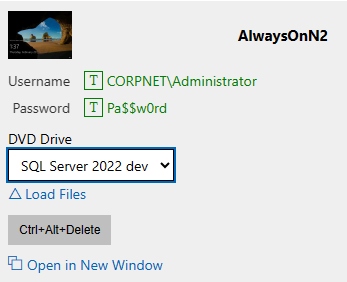
In the lab environment, on the Resources tab, select the AlwaysOnN2 virtual machine, and then in the DVD Drive drop-down list, select the SQL Server 2022 installation media (ISO).
Open File Explorer in the AlwaysOnN2 machine and you should see the installation media as shown below. Right click Setup and select Run as administrator to launch the setup program.
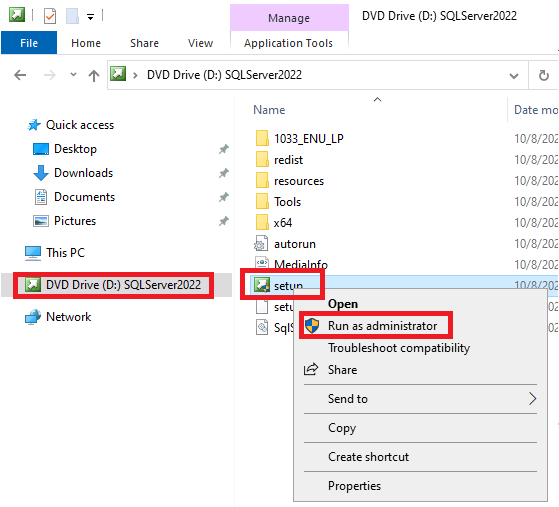
This will open the User Account Control popup. Click Yes.
On the SQL Server Installation Center page, click Installation and then click Add node to a SQL Server failover cluster as shown below.
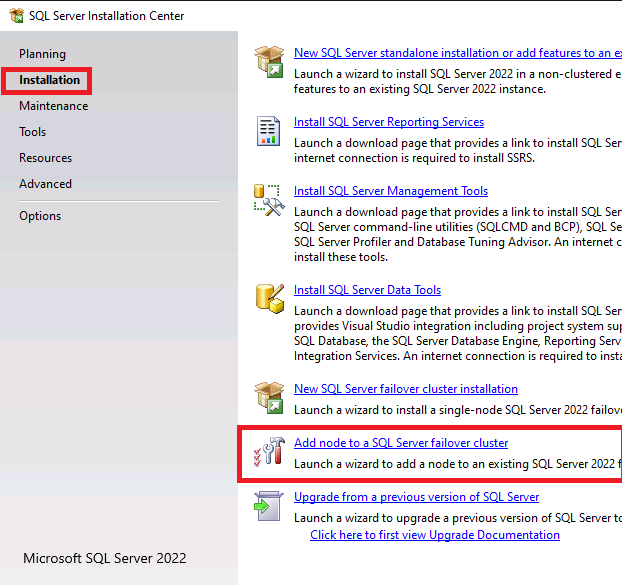
For this lab, we are going to the free Developer edition.
For production environment you cannot use developer edition and must enter the license product key.
Accept the license terms and click Next.
Verify that there are no errors on the Global Rules page and click Next.
On the Microsoft Update page, do not click the checkbox to use Microsoft Update to check for updates. In this lab, we are not checking the box as the VMs are not connected to the internet. Click Next.
Since the virtual machine is not connected to the internet, you will get the below error. This is expected in this lab. Click Next.
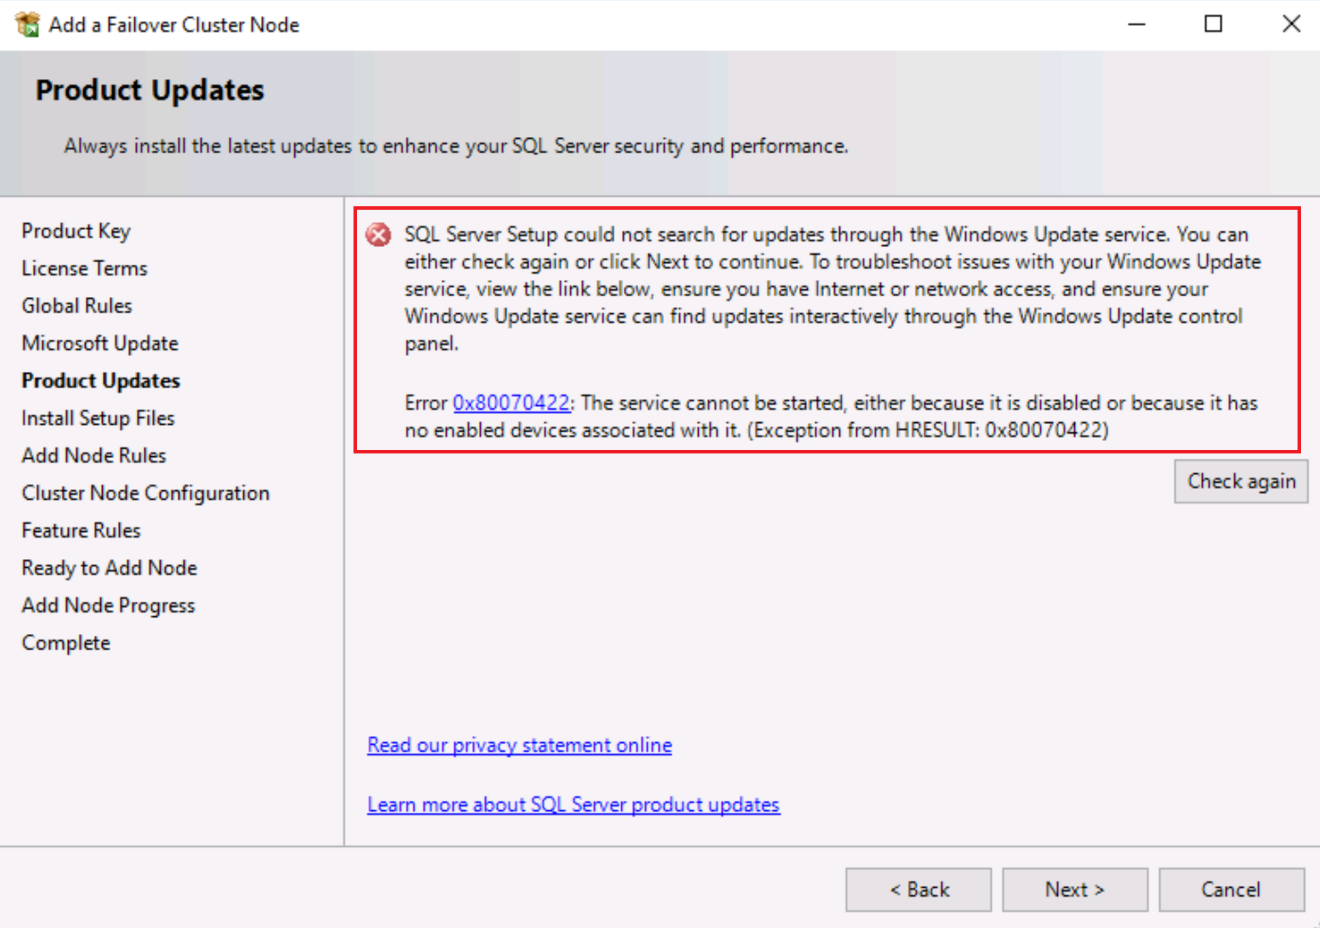
Verify that there are no failures on the Add Node Rules page and click Next.
Review the details on the Cluster Node Configuration page and click Next.
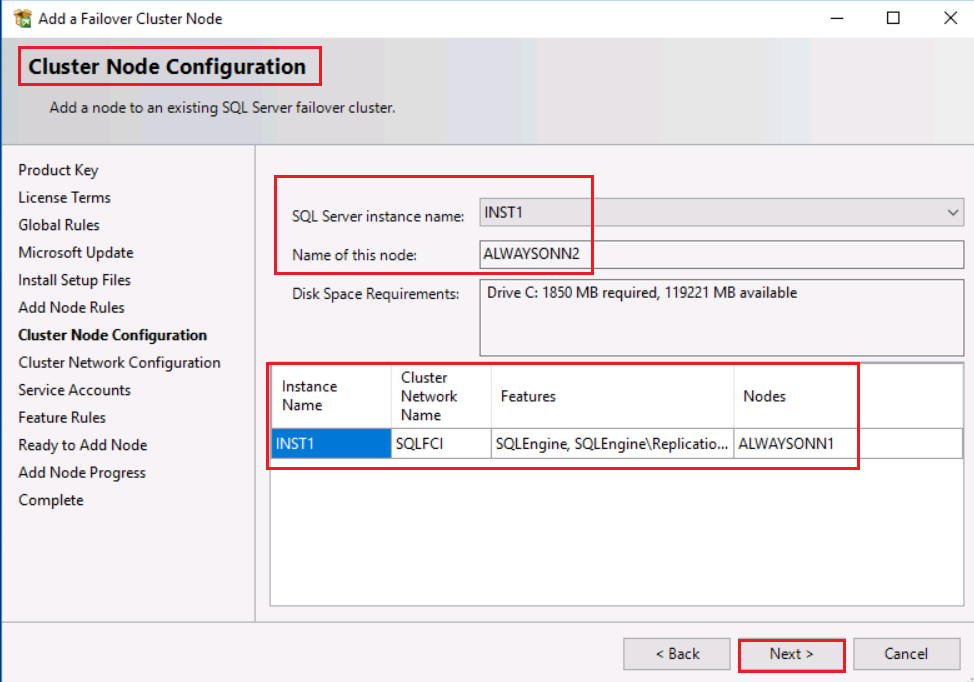
Review the details on the Cluster Network Configuration page and click Next
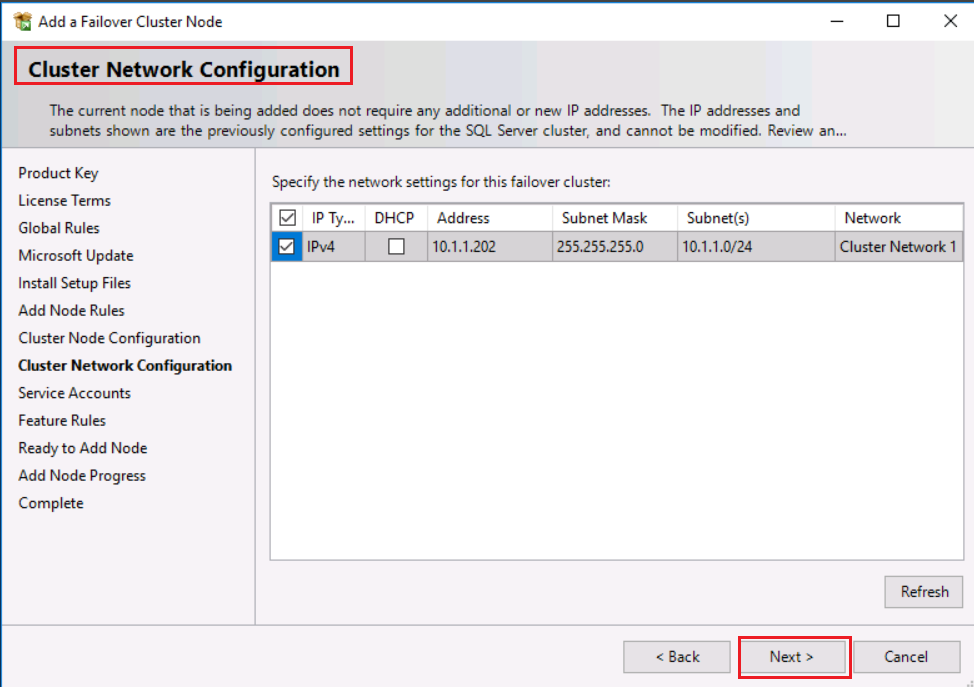
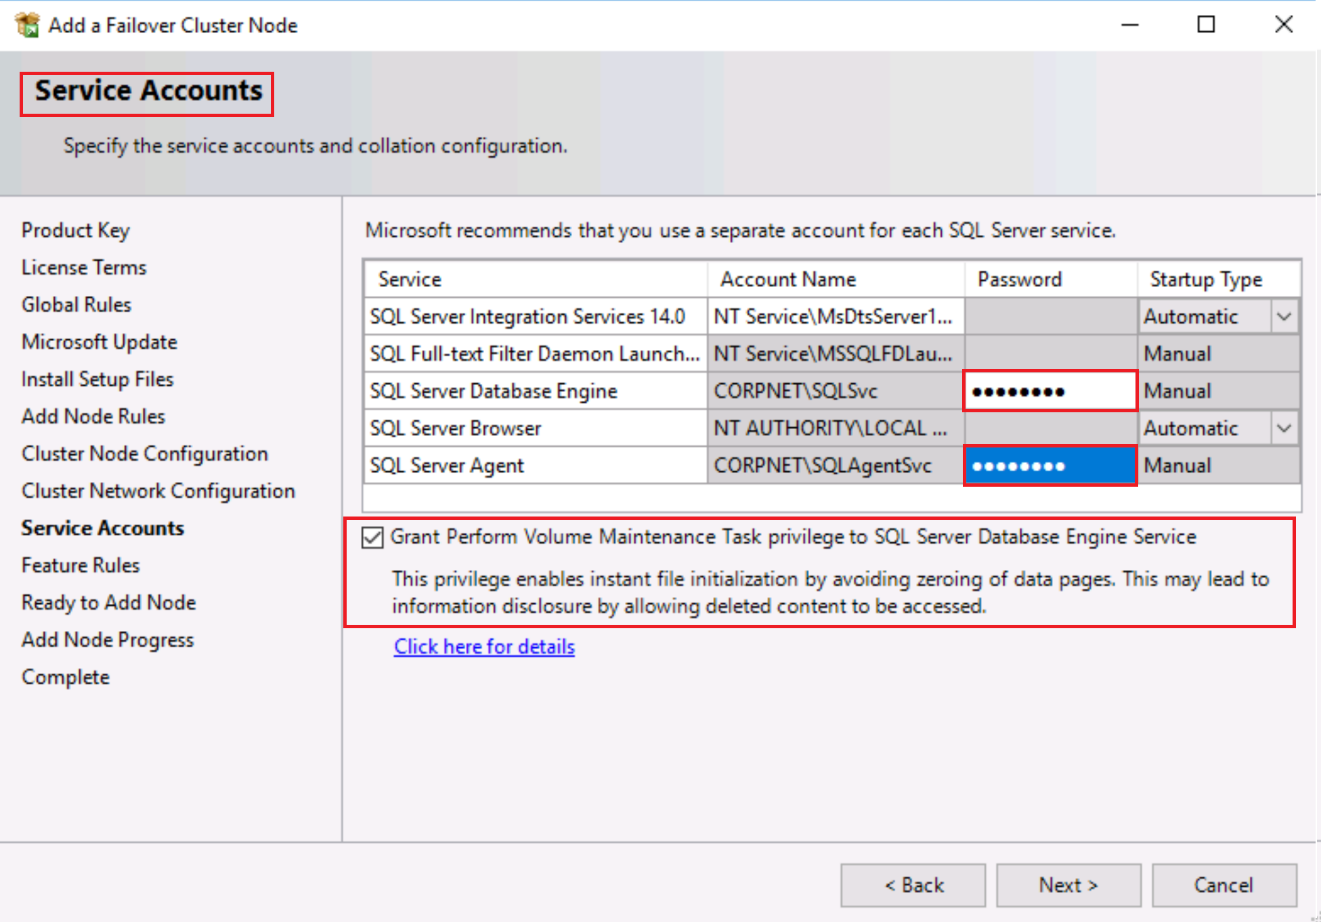
On the Service Accounts page, type the password for the SQL Server Database Engine and SQL Server Agent service accounts, check Grant Perform Volume Maintenance Task privilege checkbox, and then click Next.
The password for both these accounts is Pa$$w0rd.
Verify that there are no failures on the Feature Rules page, and click Next.
Review the information on the Ready to Add Node page and click Install.
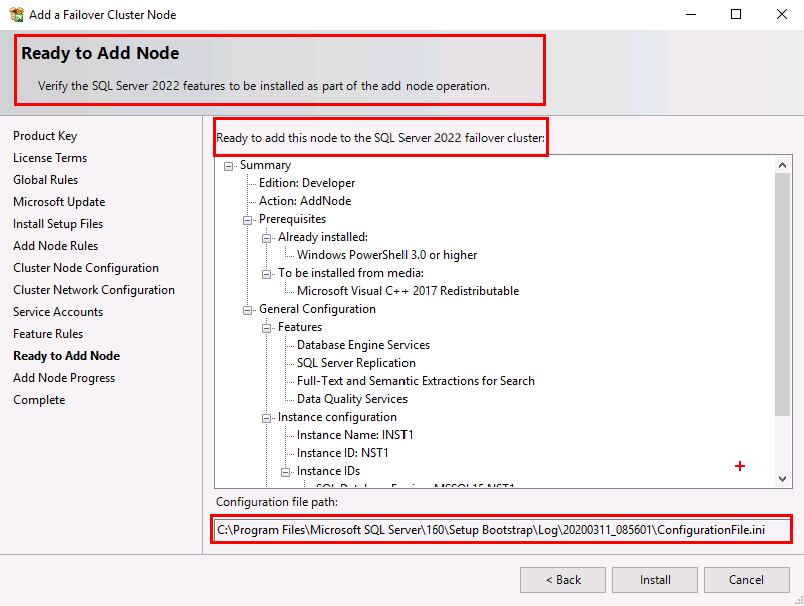
On the Ready to Install page, notice that the path to the configuration file is specified. Setup writes out all the parameters in the configuration file for the actions that ran, except for sensitive information like passwords. If you want to stop the installation now, click Cancel. Later, when you are ready, you can run the installation from the Command Prompt and supply the Configuration.ini file by using the ConfigurationFile parameter.
Wait till the setup completes.
Ensure all the features installed successfully.
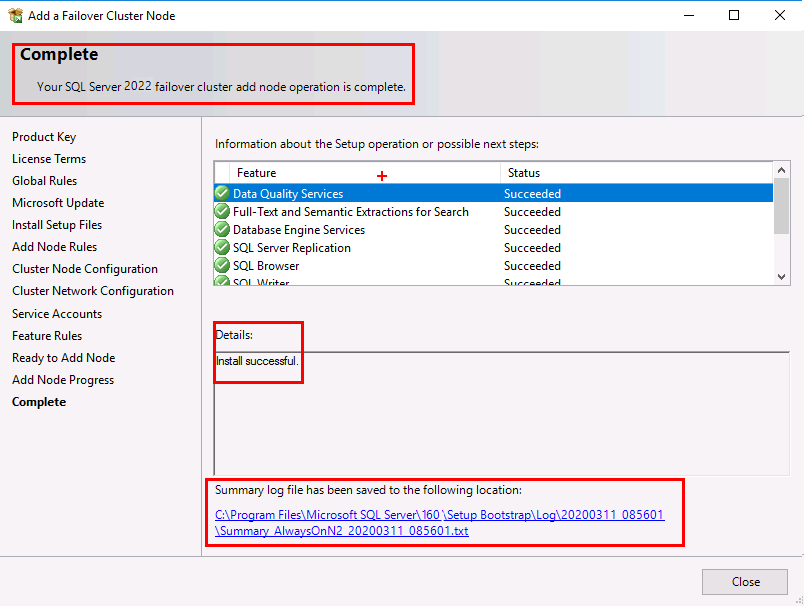
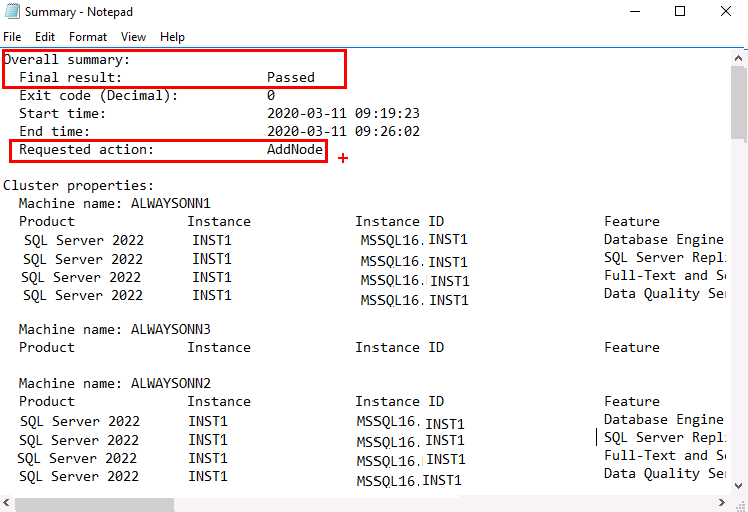
Click the link for the Summary log file and review it. Click Close on the Complete page.
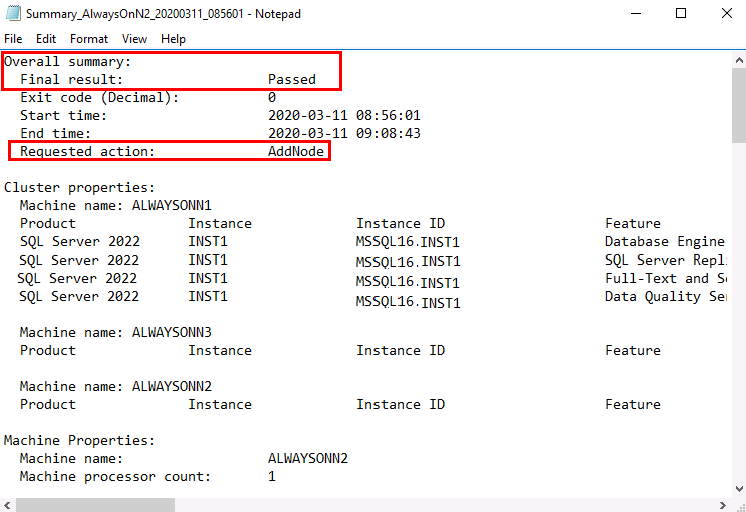
Now we have a two-node SQL Server Failover Cluster instance on a three-node Windows Server Failover Cluster.
If time permits, add AlwaysOnN3 cluster node to the FCI. Either repeat the above steps on AlwaysOnN3 cluster node to create a three-node SQL Server FCI or add the third node using command line setup following the steps below.
Select the SQL Server setup media from the DVD drop-down box of AlwaysOnN3. Open an Administrator: Command Prompt, change directory to D:> and type the below command
CommandPromptsetup.exe /q /ACTION=AddNode /INSTANCENAME="INST1" /SQLSVCACCOUNT="CORPNET\SQLSVC" /SQLSVCPASSWORD="Pa$$w0rd" /AGTSVCACCOUNT="CORPNET\SQLAgentSVC" /AGTSVCPASSWORD="Pa$$w0rd" /IAcceptSQLServerLicenseTerms /INDICATEPROGRESS
You can also copy this command and use the Paste clipboard text functionality of the LOD environment to paste it in the VM.
After the setup completes, review the Summary file to ensure it succeeded.

Congratulations!
You have successfully completed this exercise. You can move to the next lab.